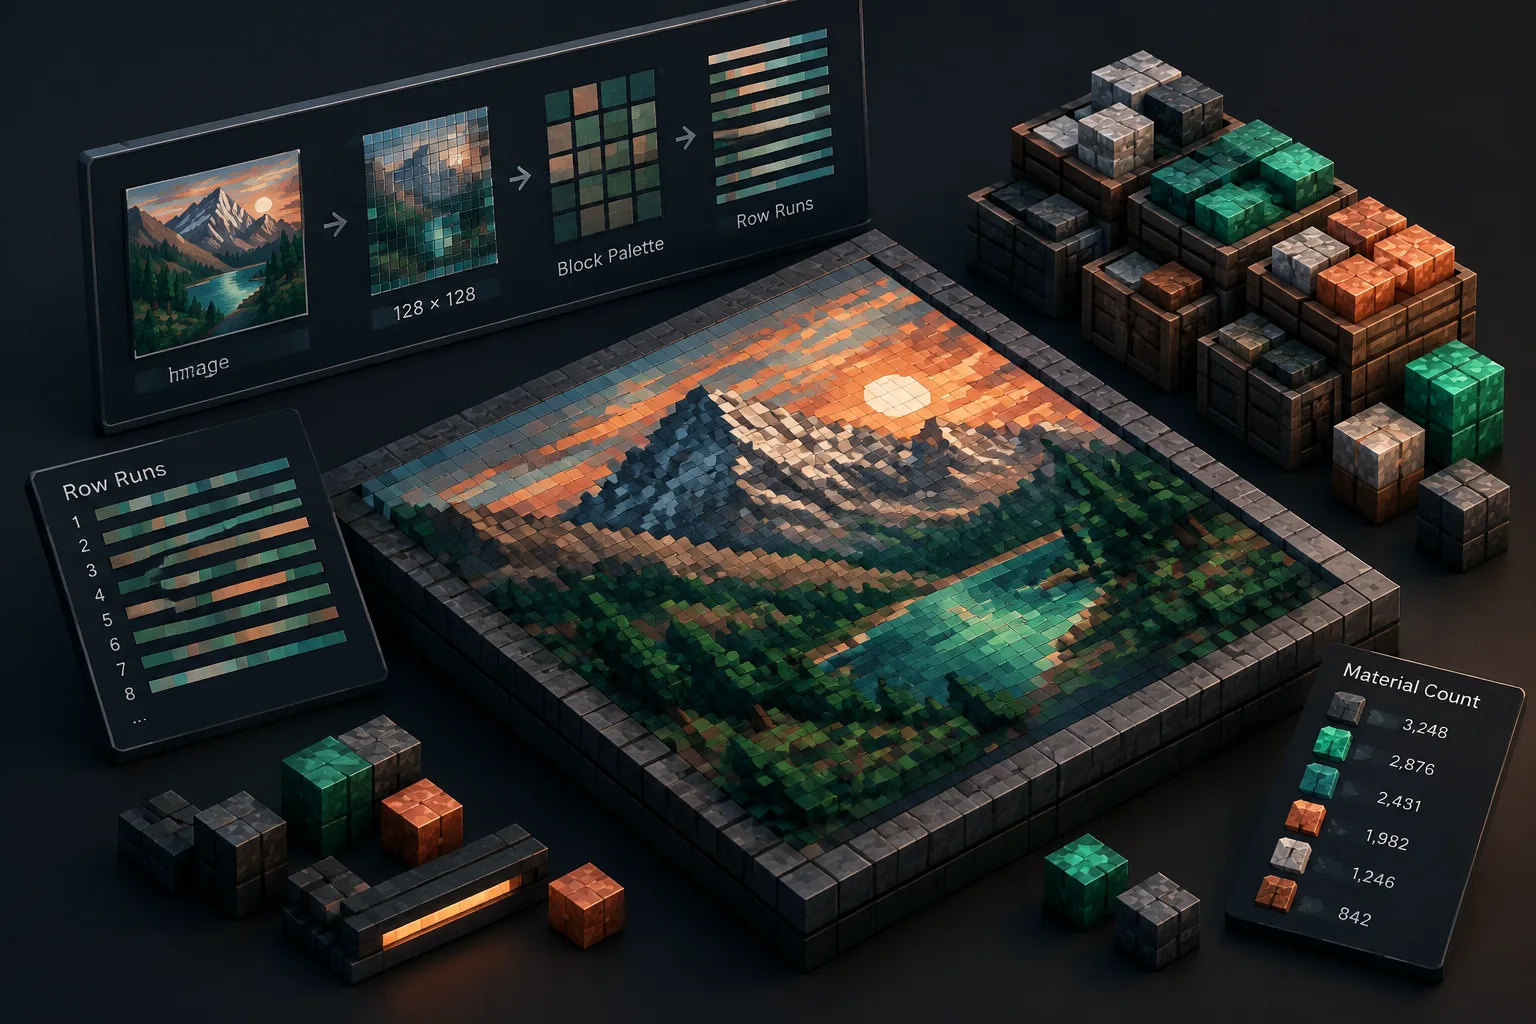
A Minecraft map art generator is a planning tool that converts an image into a block-by-block layout for a map in Minecraft. On MinecraftCircle, you use the browser-based pixel art generator to set a 128×128 map grid, choose a block palette, and export a deterministic plan. It is for survival and creative builders who want accurate colors, row runs, and material counts before placing thousands of blocks. Same settings always rebuild the same plan, so you can test layouts without wasting resources.
What a Minecraft Map Art Generator Does
A map art generator does not place blocks for you. It rasterizes your image into pixels, maps each pixel to a block color, and outputs a build plan. The plan can include row runs, layer notes, palette assignments, and material counts.
The important word is deterministic. If you load the same image, choose the same map size, and use the same palette, the generator will produce the same plan every time. That makes it possible to compare drafts, estimate materials, and share a plan with another builder without guessing.
This site is an independent fan-made utility. It is not affiliated with Mojang or Microsoft, and it does not use official game assets. Think of it as a measuring and planning aid, not an automatic builder.
Map Art Geometry You Need to Get Right
Map dimensions and scale
In Java Edition, a standard scale-0 map covers 128×128 blocks. That means one block equals one map pixel. If you expand a map with paper, it covers more area but each pixel represents a larger area, so map art is usually built for scale 0.
A 1×1 map art uses 128×128 blocks. A 2×2 map wall uses 256×256 blocks. A 3×3 map wall uses 384×384 blocks. The formula is simple: 128 times the number of maps per side. Bedrock Edition map behavior is similar for standard maps, but test your version before building a large wall.
Odd and even centers
A single map is 128×128 blocks, which is an even grid. There is no single center block; the center falls at the intersection of four blocks. This matters when you build circular borders or medallions around map art. Use even-diameter circle plans when the canvas is even.
For a 3×3 map wall, the middle map is still 128×128 and still even. Odd and even centers also affect circle charts, ovals, domes, and spheres. If you need exact row runs for a round frame, start with the circle chart rather than eyeballing it.
Row runs and layers
A row run tells you how many blocks of one color to place before switching. For example: Row 12: 4 light gray concrete, 7 green concrete, 16 light gray concrete, 3 brown terracotta. That is a rasterized run, not a perfect curve. You build it row by row.
For flat map art, the layer is usually one Y level. For 3D sculptures that sit near a map wall, layers are Y levels. The sphere generator and dome generator can help with those shapes, but the map art itself should stay flat if you want a clean top-down image.
Measured Method: From Image to Material Counts
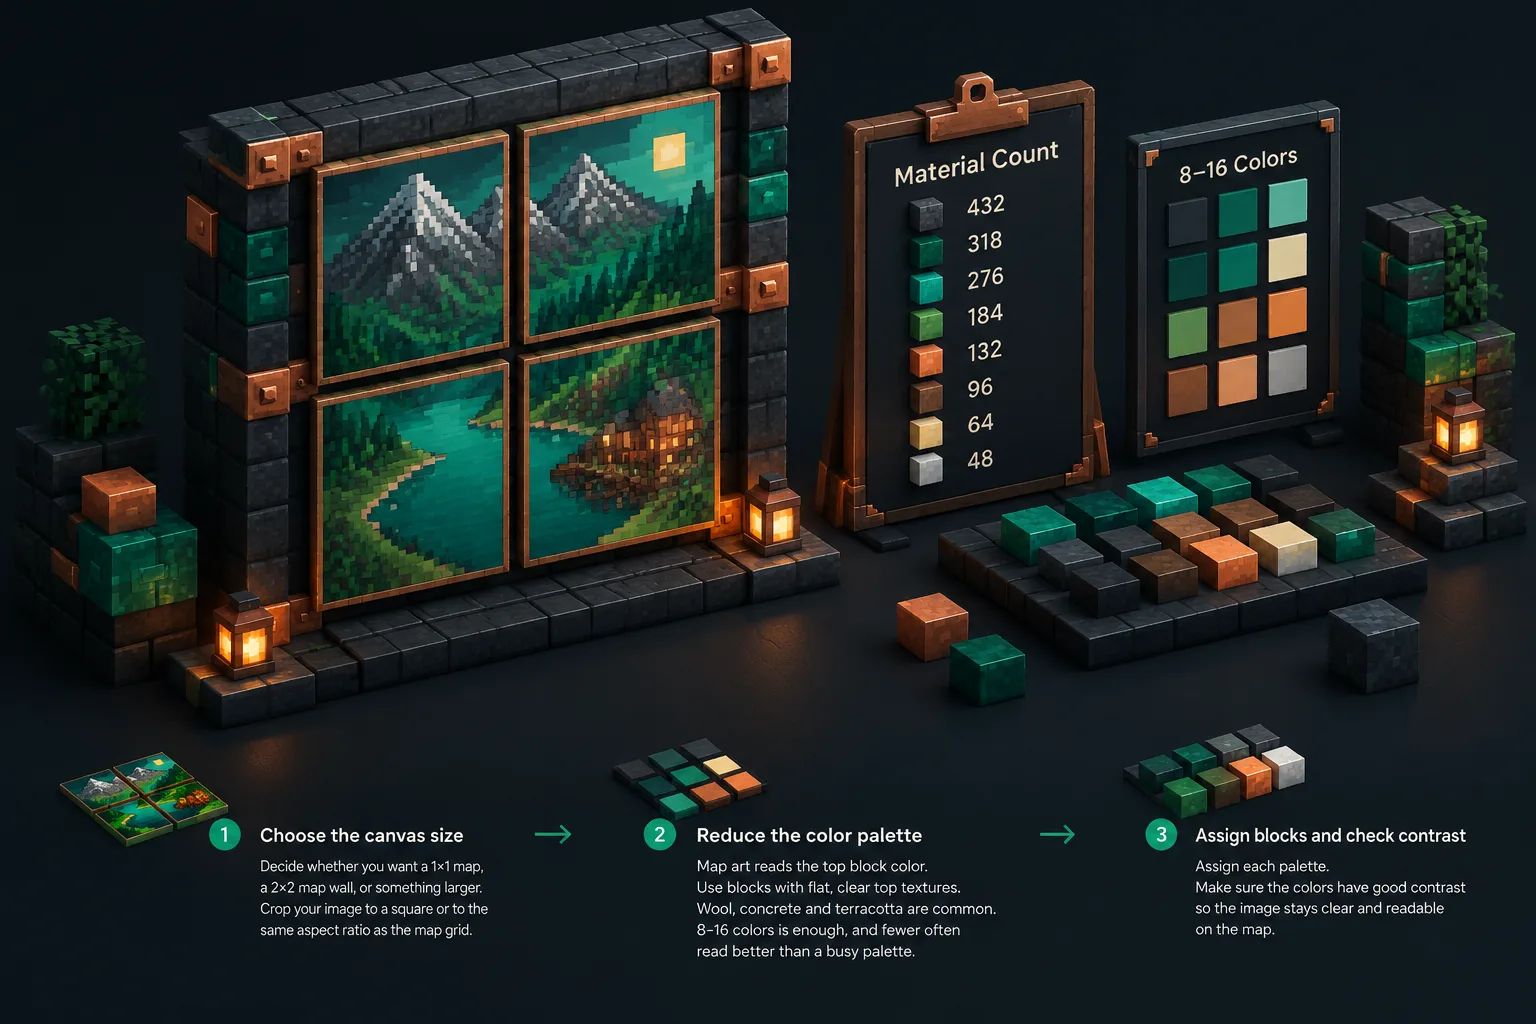
Step 1: Choose the canvas size
Decide whether you want a 1×1 map, a 2×2 map wall, or something larger. Crop your image to a square or to the same aspect ratio as the map grid. The generator can slice a larger image into individual 128×128 tiles.
Step 2: Reduce the color palette
Map art reads the top block color. Choose blocks with flat, clear top textures. Wool, concrete, and terracotta are common choices. Avoid blocks with noisy or directional tops because they can make the final map look muddy.
For most builds, 8 to 16 colors are enough. Fewer colors often read better on a map than a busy palette with many near-identical shades.
Step 3: Assign blocks and check contrast
Assign each palette entry to a block and preview the result as map colors, not inventory icons. Some blocks look very different once a map renders them. If two colors are hard to tell apart in the preview, replace one before you gather materials.
Step 4: Calculate material counts with a worked example
Suppose your 128×128 plan uses 16,384 block pixels and the generator reports six palette shares. The counts might look like this:
| Color role | Share | Blocks | Stacks |
|---|---|---|---|
| Sky | 45% | 7,373 | 115 stacks + 13 |
| Outline | 15% | 2,458 | 38 stacks + 26 |
| Primary | 20% | 3,277 | 51 stacks + 13 |
| Secondary | 10% | 1,638 | 25 stacks + 38 |
| Highlight | 5% | 819 | 12 stacks + 51 |
| Shadow | 5% | 819 | 12 stacks + 51 |
That is a planning example, not a promise about your image. The generator's own palette report will give the real counts for your file. For a 2×2 map wall, repeat the count for each tile and then add the totals.
Step 5: Verify row runs and orientation
Check the first few rows and the last few rows before you build. Maps are oriented with north at the top. If your image needs to face a different direction, rotate it before generating the plan. Mark your northwest corner on the build site so you do not mirror the art by accident.
Step-by-Step Build Workflow
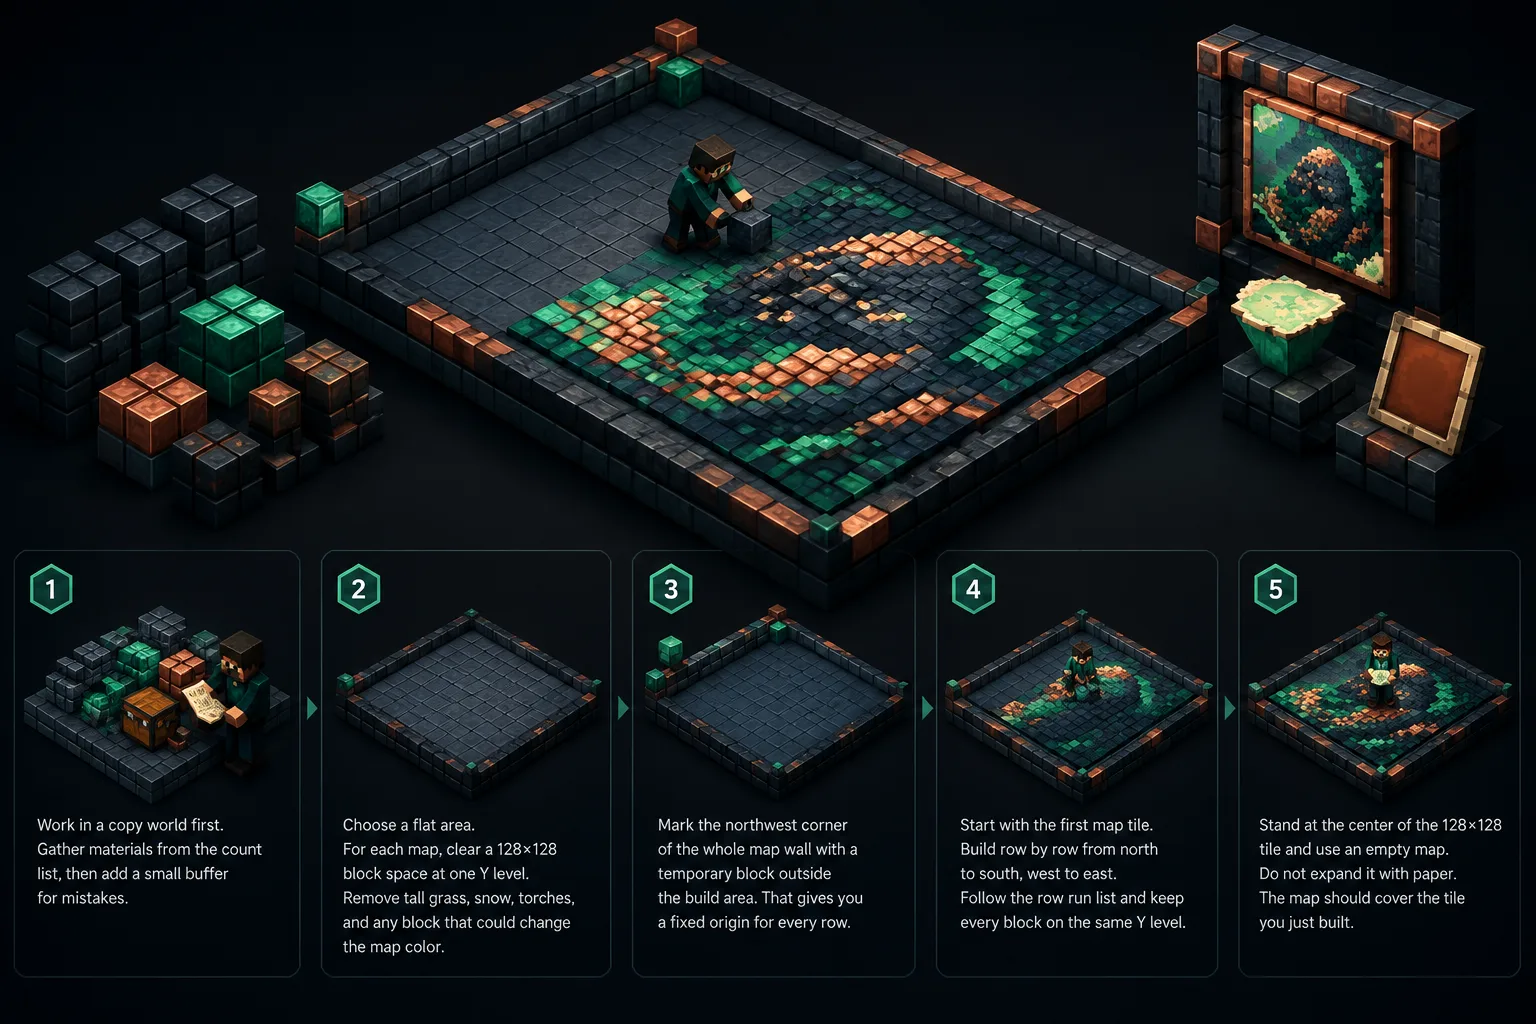
- Work in a copy world first. Gather materials from the count list, then add a small buffer for mistakes.
- Choose a flat area. For each map, clear a 128×128 block space at one Y level. Remove tall grass, snow, torches, and any block that could change the map color.
- Mark the northwest corner of the whole map wall with a temporary block outside the build area. That gives you a fixed origin for every row.
- Start with the first map tile. Build row by row from north to south, west to east. Follow the row-run list and keep every block on the same Y level.
- Stand at the center of the 128×128 tile and use an empty map. Do not expand it with paper. The map should cover the tile you just built.
- Place the map in an item frame in the correct order for a map wall. For a 2×2 wall, the top-left frame corresponds to the northwest tile.
- Repeat for each tile. If the image looks shifted, check the map center and the tile corners before you move blocks.
- Test the full wall in the copy world. Only then repeat the same plan on your main world or server.
Using exports safely
Images, text, CSV, and Markdown exports work everywhere. Litematic export is for compatible Java Edition mod workflows. If you use a litematic file, test the import in a copy world before loading it near a build you care about.
Common Mistakes and Boundaries
Building vertically is the most common map art mistake. Maps show a top-down view, so map art is usually built flat on the ground, one block high.
Using noisy blocks is another problem. A block that looks fine in your inventory may render as a messy texture on the map. Flat-topped blocks are safer.
Ignoring map scale also causes trouble. If you expand a map with paper, your art becomes smaller in the map frame. Keep the map at scale 0 for pixel-perfect map art.
Off-by-one errors are common with even canvases. A 128×128 map has no single center block. If you build a circle around it, use an even-diameter plan from the circle chart.
Finally, do not assume every edition behaves the same. Test your map creation, item frame placement, and orientation in your own version before building a large wall. This site is independent and not endorsed by Mojang or Microsoft.
How MinecraftCircle Fits Into a Map Art Build
The pixel art generator is the main tool for this workflow. Use it to load an image, set 128×128 per map, choose blocks, and export row runs and counts.
For round borders or circular logos, use the circle chart. For 3D sculptures that sit beside a map wall, use the sphere generator and dome generator. For decorative stars, use the star generator. If you want to build a gallery around your map art, Minecraft house designs gives measured plans. You can also start at the main circle tool when your map art includes round shapes.
For more detail, read the circle building guide and the pixel art generator tool guide.
FAQ
What size should a Minecraft map art be?
For a single map, use 128×128 blocks at scale 0. For a wall, multiply by maps per side: 2×2 is 256×256 blocks, and 3×3 is 384×384 blocks. The generator will slice your image into 128×128 tiles.
How do I convert an image to Minecraft map art?
Crop and resize the image to your target grid, reduce it to a block palette, then generate row runs and material counts. Use the pixel art generator to do this deterministically. Build the plan flat on the ground and create a scale-0 map at the center of each tile.
Do I need mods to make map art?
No. You can build map art in vanilla Java or Bedrock by placing blocks. Mods only help with schematics or litematic imports. Our litematic export is for compatible Java Edition mod workflows; images, text, CSV, and Markdown work everywhere. Test imports in a copy world.
Why does my map art look wrong?
Common causes include building vertically instead of flat, using blocks with noisy textures, expanding the map with paper, wrong north orientation, or an off-by-one center. Check the row runs and rebuild in a copy world. Use flat-topped blocks like wool, concrete, and terracotta.
Can I use a Minecraft map art generator for circles and logos?
Yes. For round logos, combine a map art plan with a circle chart. For 3D elements around the map, use the sphere generator, dome generator, or star generator. Keep the map art itself flat for correct map colors.
Ready to plan your next map wall? Open the pixel art generator, set 128×128, choose a palette, and export your row runs. Build in a copy world first, then repeat the same plan on your main world.