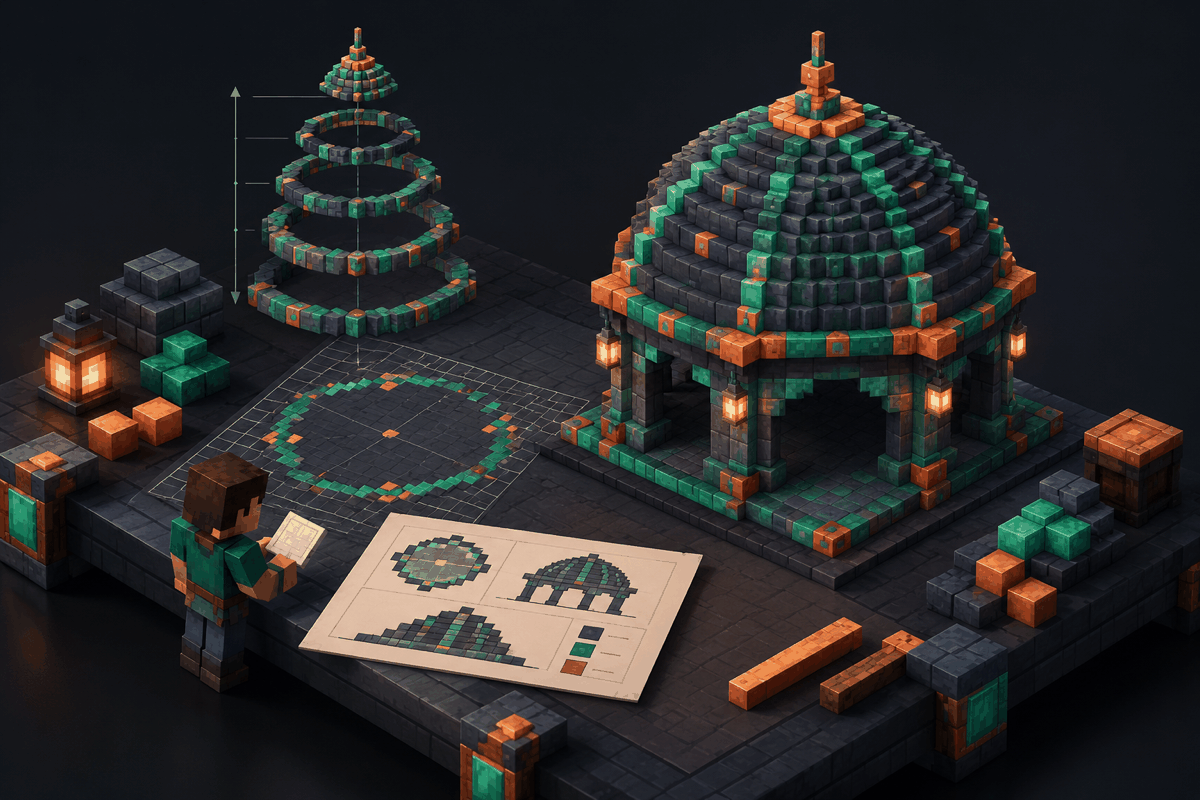
A dome roof is one of the most rewarding architectural features you can add to a Minecraft build. Unlike a flat roof or a simple staircase-style roof, a dome creates a sense of height, symmetry, and craftsmanship. Domes work especially well on castles, temples, observatories, fantasy houses, underground halls, and large survival bases where you want the roof itself to become a major design feature.
Learning how to build a dome roof in Minecraft is mainly about understanding curves. Minecraft blocks are square, so creating a rounded shape requires careful planning with layers, spacing, and block placement. The easiest way to succeed is to stop thinking about the dome as a smooth real-world surface and instead treat it as a series of carefully arranged horizontal layers.
This guide explains the complete process, from choosing dimensions and materials to creating a balanced dome roof with practical examples. For more measured Minecraft shapes, you can also explore the Minecraft circle generator and Minecraft dome generator to plan your builds before placing blocks.
Understanding Minecraft Dome Roof Design
A dome is a rounded roof structure that rises from a circular or polygonal base. In Minecraft, a dome is usually created by stacking smaller and smaller circular layers until the roof reaches a peak.
The basic idea is simple:
- Build or identify a circular base.
- Add a layer of blocks around the top edge.
- Reduce the diameter gradually as the dome rises.
- Continue until only a small cap remains at the top.
Because Minecraft uses a block grid, every curve is actually a pattern of straight lines and corners. A well-designed dome does not need every edge to be perfectly smooth. Instead, it needs consistent proportions and symmetry.
A useful starting point is deciding the width of the building. Small domes can work with diameters of 7 to 15 blocks, while large decorative domes may require 30 blocks or more. Larger domes generally look smoother because you have more room to create gradual changes between layers.
Choosing the Right Dome Size
Before placing any blocks, determine the scale of your roof. The dome height should match the width of the structure.
Common proportions include:
Small dome roofs
A small dome between 7 and 15 blocks wide works well for:
- Tower roofs
- Garden structures
- Small fantasy houses
- Villager buildings
These domes can often be built directly by eye because mistakes are easy to correct.
Medium dome roofs
A medium dome between 16 and 31 blocks wide is ideal for:
- Castle halls
- Libraries
- Churches
- Community builds
At this size, using a planned layer pattern becomes much more important. A single misplaced block can make one side look uneven.
Large dome roofs
Large domes above 32 blocks wide are usually best planned with a chart or generator. Tools such as a Minecraft circle chart can help create the base outline before you begin building upward.
Large structures benefit from marking the center point first. Once the center is confirmed, every layer can be measured outward from the same location.
Step-by-Step: How to Build a Dome Roof in Minecraft
Step 1: Prepare the foundation
Start with the structure that will support the dome. The roof should have a clear center point and a symmetrical base.
For example, if you are building a circular tower, mark the center block on the floor. Then create the outer wall using a circle pattern. This foundation determines the final shape of your dome.
Avoid building the dome first and trying to attach it later. A dome that does not match the building below will usually look disconnected.
Step 2: Create the first dome layer
The first layer is the widest part of the roof. It normally follows the same shape as the top of the building.
If your building is circular, the first dome layer should sit directly on the wall edge. If your building is square, you can create a transition layer using stairs, slabs, or decorative blocks before starting the rounded section.
This transition helps the roof feel intentional instead of like a circle placed on top of a box.
Step 3: Build upward with shrinking layers
The key technique for a dome roof is reducing each layer gradually.
A simple example for a medium dome might look like this:
- Bottom layer: full circle width
- Second layer: move inward by one block
- Third layer: repeat the smaller circle
- Fourth layer: reduce again
- Final layers: create a small peak or cap
The exact pattern depends on the size of your dome. Larger domes need more gradual changes, while smaller domes can use faster reductions.
Using a Minecraft sphere generator can also help you understand how curved surfaces are distributed across Minecraft blocks. Although a dome is only the upper half of a sphere, the same layering principles apply.
Step 4: Shape the top of the dome
The final section is where many builders struggle. If the top narrows too quickly, the dome looks like a cone. If it stays wide for too long, the roof appears flat.
Good finishing options include:
- A single decorative block at the peak
- A small tower or lantern structure
- A glass skylight
- A weather vane or fantasy ornament
The top should match the style of the building underneath.
Best Materials for Minecraft Dome Roofs
The right blocks can change the entire feeling of a dome.
Stone and deepslate domes
Stone, andesite, and deepslate create strong architectural designs. They work well for castles, underground bases, and ancient structures.
Wood domes
Wooden domes create a warmer appearance. Different wood types can be combined to create curved patterns and decorative rings.
Copper and metal-style domes
Copper blocks create a distinctive aged appearance. Mixing copper tones can make a dome look like a realistic weathered roof.
Glass domes
Glass is useful for observatories, fantasy towers, and modern builds. A glass dome often works best when paired with a darker frame.
For complex decorative builds, you can combine your roof plans with ideas from the Minecraft house designs collection.
Practical Example: Building a Castle Dome Roof
Imagine you are creating a castle hall with a 25-block-wide circular room.
A practical approach would be:
- Build the circular stone walls first.
- Create a thick roof edge using stone bricks.
- Add a wide first dome layer that matches the wall diameter.
- Reduce the roof width gradually every few layers.
- Add darker blocks near the lower edge for depth.
- Finish with a small tower or decorative peak.
The result is a roof that feels connected to the castle rather than simply placed above it.
Common Dome Roof Mistakes and How to Avoid Them
Making the dome too steep
A common mistake is reducing the width too quickly. This creates a pointed roof instead of a dome.
Solution: Add more intermediate layers and make smaller changes between heights.
Ignoring symmetry
Building one side completely and copying it by memory can create uneven results.
Solution: Mark the center lines and build each layer evenly around the structure.
Using only one block type
A dome made from one plain material can look flat.
Solution: Add texture through rings, trim, lighting, and material variation.
Skipping planning for large builds
Large domes require more precision than small roofs.
Solution: Use measured templates such as a Minecraft circle chart or a dome planning tool before construction begins.
Advanced Dome Roof Ideas
Once you understand the basic structure, you can create more advanced designs.
Layered fantasy domes
Add multiple colors or materials between layers to create magical towers and fantasy landmarks.
Open skylight domes
Replace the center blocks with glass to create a natural lighting feature.
Multi-dome buildings
Large temples and palaces can combine several domes of different sizes. Planning each base separately helps maintain balance.
Pixel-art inspired domes
You can experiment with decorative patterns by planning shapes with a Minecraft pixel art generator and adapting the patterns onto curved surfaces.
FAQ: Building Dome Roofs in Minecraft
What is the easiest way to build a dome roof in Minecraft?
The easiest method is to start with a circular base and build upward using smaller circular layers. Small domes can be created manually, while larger domes are easier with a planned template.
How many blocks wide should a Minecraft dome roof be?
There is no fixed size, but wider domes usually look more natural because they allow smoother transitions between layers. A diameter of 15 blocks or more gives you more design flexibility.
Can I build a dome roof on a square house?
Yes. Add a transition section between the square walls and the circular dome. Stairs, slabs, and decorative supports can help blend the two shapes together.
Should I use a dome generator for large builds?
A generator can save time and improve accuracy for large or symmetrical projects. It provides a reference pattern so you can focus on construction instead of manually calculating every layer.
What blocks look best for a dome roof?
The best blocks depend on the style of your build. Stone works well for medieval structures, wood creates a natural look, copper adds character, and glass creates modern or fantasy designs.
Start Planning Your Next Minecraft Dome Build
A great dome roof begins with accurate planning and a clear layer-by-layer approach. Whether you are creating a small tower or a massive fantasy palace, understanding how curves translate into Minecraft blocks will help you build cleaner and more impressive structures.
Before placing hundreds of blocks, plan your shape with the right tools. Try the Minecraft dome generator to create a measured starting point, then bring your design into your world and customize it with your own materials and style.